
Being a successful student requires more than just a willingness to learn, however. Pitfalls do exist and students must know how to effectively learn in order to overcome them.
It has been discovered that there are three definite barriers which can block a person’s ability to study and thus his ability to be educated. These barriers actually produce different sets of physical and mental reactions.
If one knows and understands what these barriers are and how to handle them, his ability to study and learn will be greatly increased.
The First Barrier: Absence of Mass
In Study Technology, we refer to the mass and the significance of a subject. By mass we mean the actual physical objects, the things of life. The significance of a subject is the meaning or ideas or theory of it.
Education attempted in the absence of the mass in which the technology will be involved is hard on a student.
If you were studying about tractors, the mass would be a tractor. You could study a textbook all about tractors, how to operate the controls, the different types of attachments that can be used—in other words, all the significance—but can you imagine how little you would understand if you had never actually seen a tractor?
Such an absence of mass can actually make a student feel squashed. It can make him feel bent, sort of dizzy, sort of dead, bored and exasperated.
Photographs or motion pictures can be helpful because they represent a promise or hope of the mass. But if one is studying about tractors, the printed page and the spoken word are not a substitute for an actual tractor!
Educating a person in a mass that he does not have and which is not available can produce some uncomfortable and distracting physical reactions.
If you were trying to teach someone all about tractors but you did not show him any tractors or let him experience the mass of a tractor, he would wind up with a face that felt squashed, with headaches and with his stomach feeling funny. He would feel dizzy from time to time and often his eyes would hurt.
Students of any age can run into this barrier. Let us say that little Johnny is having an awful time at school with his arithmetic. You find out that he had an arithmetic problem that involved apples, but he never had any apples on his desk to count. Get him some apples and give each one of them a number. Now he has a number of apples in front of him—there is no longer a theoretical number of apples.
The point is that you could trace Johnny’s problem back to an absence of mass and remedy it by supplying the mass; or you could supply an object or a reasonable substitute.
This barrier to study—the studying of something without its mass ever being around—produces these distinctly recognizable reactions.
Remedying an Absence of Mass
As not everyone studying has the actual mass available, useful tools to remedy a lack of mass have been developed. These come under the subject of demonstration.
Demonstration comes from the Latin demonstrare: “to point out, show, prove.”
The Chambers 20th Century Dictionary includes the following definition of demonstrate: “to teach,
In order to supply mass, one would do a demonstration. One way of accomplishing this is with a “
If a student ran into something he couldn’t quite figure out, demonstrating the idea with a demo kit would assist him to understand it.
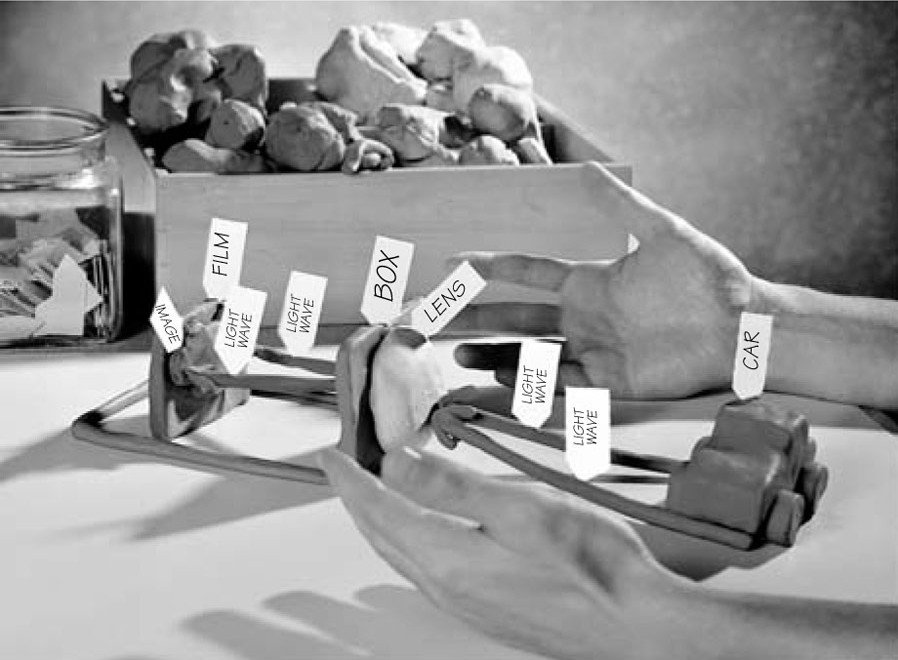
Anything can be demonstrated with a demo kit: ideas, objects, interrelationships or how something works. One simply uses these small objects to represent the various parts of something he is studying about. The objects can be moved about in relation to each other to show the mechanics and actions of a given concept.
Another means of demonstrating something is by sketching.
Someone sitting at his office desk trying to work something out can take a pencil and paper and, by sketching out or drawing graphs of what he was working with, get a grip on it.
There is a rule which goes if you cannot demonstrate something in two dimensions, you have it wrong. It is an arbitrary rule—based on judgment or discretion—but is very workable.
This rule is used in engineering and architecture. If it cannot be worked out simply and clearly in two dimensions, there is something wrong and it couldn’t be built.
Sketching and two-dimensional representation is all part of demonstration and of working something out.
A third means of supplying mass to clarify principles is through the use of modeling clay to make a clay demonstration, or “clay demo,” of a principle or concept.
The purpose of clay demonstration is:
- to make the materials being studied real to the student,
- to give a proper balance of mass and significance,
- to teach the student to apply.
- The whole theory of clay demonstrations is that they add mass.

Demo kit demonstrations work on this principle too, only a clay demonstration more closely represents the thing being demonstrated and provides more mass.
Any student can use clay to demonstrate an action, definition, object or principle. He sits at a table set up with different colors of modeling clay for his use. He demonstrates the object or principle in clay, labeling each part. The clay shows the thing. It is not just a blob of clay with a label on it. Small strips of paper are used for labels.
For example, say a student wants to demonstrate a pencil. He makes a thin roll of clay which is surrounded by another layer of clay—the thin roll sticking slightly out of one end. On the other end goes a small cylinder of clay. The roll is labeled “lead.” The outer layer is labeled “wood.” The small cylinder is labeled “
Simplicity is the
Anything can be demonstrated in clay if one works at it. And just by working on how to demonstrate it or make it into clay and labels brings about renewed understanding.
In the phrase “How do I represent it in clay?” is contained the secret of the teaching. If one can represent it in clay, one understands it. If one can’t, one really doesn’t understand what it is. So clay and labels work only if the term or things are truly understood. And working them out in clay brings about an understanding of them.
Art is no object in doing clay demo work. The forms are crude.
The procedure should go: student makes one object, labels it, makes another object, labels it, makes a third object and puts a label on it and so on in sequence. This comes from the datum that optimum learning requires an equal balance of mass and
Any object or principle or action can be represented by a piece of clay and a label. The mass parts are done by clay, the significance or thought parts by label.
Directions of motion or travel are usually indicated with little arrows. The arrow can be made out of clay or it can be made as another type of label. This can become important. Lack of clarity in the demo about which way what is going or which way what is flowing can make the demo unrecognizable.
Clay demos must be large. One of the purposes of clay demonstrations is to make the materials being studied real to the student. If a student’s clay demo is small (less mass), it may not be sufficiently real to the person. Big clay demos are more successful in terms of increasing student understanding.
A well-done clay demo, which actually does demonstrate, will produce a marvelous change in the student. And he will retain the data.
Each of these three methods of remedying an absence of
give a detailed description and explanation of a theory or viewpoint.
a kit composed of various small objects such as corks, caps, paper clips, pen tops, rubber bands, etc. A student uses these small objects to represent the various parts of something he is studying about. The objects can be moved about to show the mechanics and actions of a given concept and help the student understand it. Also called a “demo kit.”
something used to rub out or erase pencil or ink markings, such as a small piece of rubber or a similar substance. American equivalent eraser.
the central or most important point or theme of something.
the meaning or ideas or theory of something, as opposed to its mass.
the actual physical objects, the things of life; as opposed to significance. See also significance in this glossary.
a model made out of clay by a student to demonstrate an action, definition, object or principle. Also called a “clay demo.”